Here's Why I Think Rorschach is Therapy
- Ananya Banka
- Mar 3, 2022
- 5 min read

Updated: Mar 29, 2022
Hii guys! I'm writing this post to tell you about this super amazing and interesting technique that I learnt about. Its called Rorschach Inkblot Test. Keep reading to know what it is and how you can try it too!
Rorschach Inkblot Test
Rorschach Test is a projective method of psychological testing in which a person is asked to describe what they see in inkblots, of which some are black and gray and some have colored patches.
I had never heard about this test until we talked about it in class for our assignment. I was like how crazy is it to use something like this for a psychological test?! Anyway, the name itself made me very excited to try this technique out. Of course we did not use it for any psychological test. We tried to bring this technique into fashion and used it to create beautiful abstract pieces. We also drew garments and croquis around it.
Let me take you through the whole process.
Here's a list of materials we need to get started -

Papers, preferably thick ones
Paints, acrylic to watercolors, anything works
Thread or rope
Palette
Brushes
Water
Lets get started!
Step #1
Take a piece of paper and fold it in half only as much as to see the crease line.
Step #2
If you are using watercolors or poster paints, take your brush, dip it in water and on one of the two halves just make the paper a little wet. This will help the colors to blend properly. If you are working with acrylics, this step can be skipped.
I tried it for the first time on a small piece of paper and I did not realize I needed to use water. I just went in with the paints and it was a total fail. The colors did not blend together and all I could see were spots which were not even symmetrical.

Step #3
On the other half, put drops of paint. You can use multiple colors to create beautiful color palettes.
Or you can color blot on the wet side. This will be easier with watercolors and poster paints. It should look something like this-

Step #4
Now fold the paper along the crease line that we made in step #1. Press the paper and move your fingers around so that the colors blend together.
Step #5
Now unfold the paper to find symmetrical patterns on both the sides. You can even add another layer of color by repeating the same process after the paint has dried.

Step #6
Draw a croquis on the paper. This pattern can be the garment of the croquis. This is how you use this technique in fashion. Its very simple yet very creative.
I flipped the pattern because I could see wings in it. This is how I drew my croquis. It is inspired by the Victoria's Secret Angels.

I tried paper cutting on this piece. I drew the wings, cut them out and pasted on a separate piece of paper.


There you go! You can explore with more colors and patterns. It depends on how you put the drops and color blots on the paper. There is also a rope technique where all you have to do is dip the rope or thread in paint, put it between the two halves of the paper and pull it out while pressing the paper with your hand. It makes beautiful textures and pattern.
You can find a tutorial on how to do it at the end of this post.
OTHER EXPLORATIONS
#1 This was the second exploration I tried after failing the first time. I tried only the rope technique for it. I mixed violet and blue color and dipped the rope in it. I did the same with green. It was much better than the first time and there were some pretty cool textures on it.

#2 The color palette for this exploration is taken from a watermelon. The red and green is really blending well.
I tried the process of color blotting with watercolors. I also put a little acrylic paint on one of the halves. That gave a unique pattern to it. After unfolding I could see an oversized puffer jacket. I drew the croquis around it.


#3 The color palette for this is Blue and Orange. They are complimentary colors and so they go together well.
I tried the color drop technique for this exploration. At first it was looking a little patchy to me so I added some water drops and folded again. This time I was satisfied with how it looked after I flipped it. To me it looks a villain's cape and I drew the croquis around it.


#4 Teal and Red is one of my favorite color combinations. I used those colors and the color blot technique for this exploration. First I folded the paper vertically and then I tried to add a little more paint and folded it horizontally. I really love how it turned out. It is not giving me a garment look but its looking more like a masquerade mask to me.


I really wanted to see how this pattern would look on a fabric and as a mask so I tried to photoshop it.


#5 The color palette for this exploration is inspired by the colors of the sunset, which are Yellow, Orange and a little Red.
I tried color blotting for this one too. I also tried the rope technique. I used teal color for it. I really like how the colors are going together. I can see two figures facing each other in the teal color.


#6 For this exploration, I used two shades of violet and one shade of pink. I tried the color drop technique for it. It did not come out how I was hoping for so I wasn't totally satisfied with how it was looking. I placed the wing cut out over it and honestly it looks good to me.


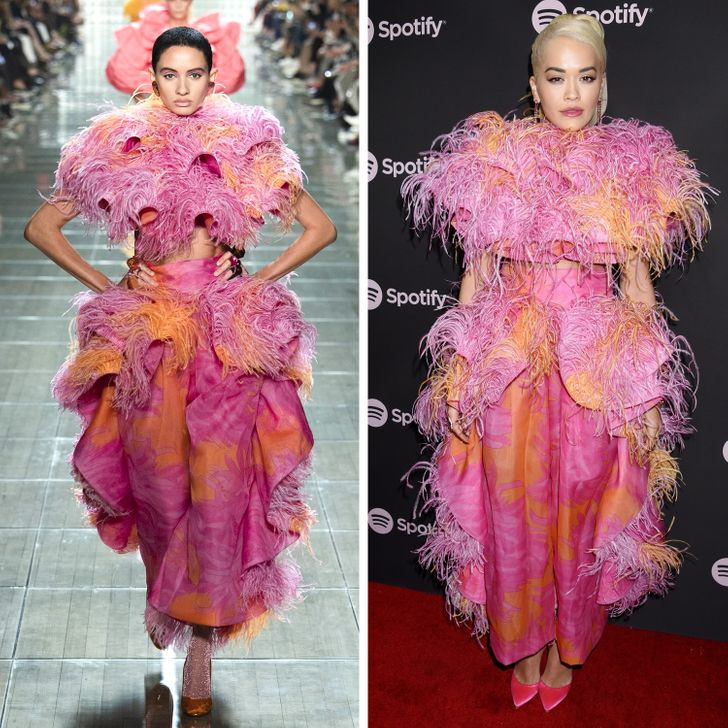
#7 The last exploration is inspired by the colors from this Marc Jacobs runway dress. I used orange, red and yellow for it.

Rorschach was one of the most interesting topics in this module for me. I really enjoyed exploring with color palettes and different techniques. This reminded me of how as kids we just randomly splattered paint without it making sense and calling it abstract! Often designers go through designers block and it is very difficult to come up with new ideas then. This is a great way to get inspiration from and start with something totally new and abstract.
And its just so satisfying, I didn't want to stop experimenting! The beautiful patterns that it makes is very calming and relaxing. This is why I call it therapy!
The more I tried exploring, the better results I was getting with each exploration. I can look at the very first one that I created and see the clear difference in the later ones.

Thank you for reading this post! I hope it was a good insight on the Rorschach Inkblot Test and how to experiment with it. You can always subscribe for more such content :)
References
Does the Rorschach Inkblot Test Really Work? (2022). Available at: https://www.verywellmind.com/what-is-the-rorschach-inkblot-test-2795806 (Accessed: 29 March 2022).
Dark Portrait Pictures | Download Free Images on Unsplash (2022). Available at: https://unsplash.com/s/photos/dark-portrait (Accessed: 29 March 2022).


Comments